What You'll Learn
Oracle VM VirtualBox is a free and open-source hosted hypervisor for x86 hardware, which allows the user to install additional operating systems (guests) under a running system (host).
This codelab shows you
- how to install VirtualBox on your HostOS.
- how to install a GuestOS based on Debian.
- how to install software required for the lectures.
Host operating system (Host OS)
This is the OS of the physical computer on which Oracle VM VirtualBox is installed.
This can be Microsoft Windows, Linux, or Mac OS host. Check the Documentation on the official web site for more details.
Administators privileges
By default, administrator privileges are required on the Host OS to install additional software. Make sure that you have the required permissions.
For the Guest OS, you will create and manage your own users. These users will therefore be different from the Host's user administration.
Typically, the GuestOS user for all codelabs is called icinga.
VirtualBox.org
- Download VirtalBox (packaged for your Host-OS) from the official web site.
- Install it on your host. For Windows: make sure to disable all Hyper-V features first.
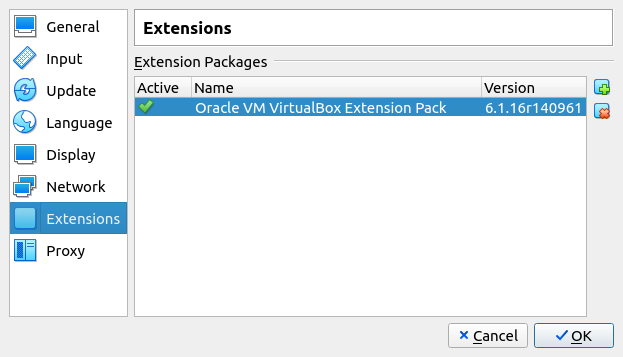
- Download the VirtualBox Extension Pack from the official web site.
- Install the VirtualBox Extension Pack via File –> Preferences –> Extensions.
 .
. - Setup a virtual machine for Debian installation.
- Set the virtual machine memory size to 4 GB for smooth operation. If your HostOS has less memory, reduce the memory size accordingly for the virtual machine.
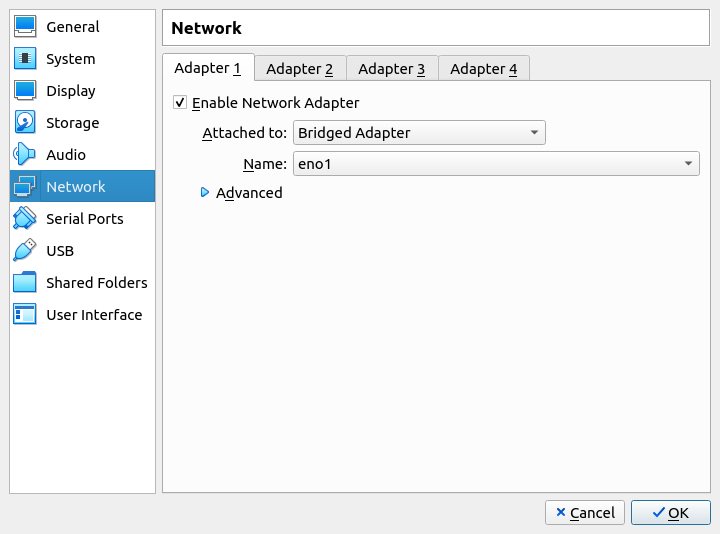
- Ensure that the virtual network is attached to a Bridge Adapter (Open Settings -> Network -> Adapter 1 -> Attached to Bridge Adapter).
Debian
- Download Debian from from the official web site.
- Ask your instructur for details about root and non-privileged user and password to ensure smooth administration.
- Start the virtual Machine and install Debian.
- Keep the installation simple.
- Use default settings. No need to encrypt your disks.
- Set up the given user and password. Ask your instructor for more details.
- After installation has finished, reboot the VM, log in with user and password, open a shell and fire a ping to a server of your choice. If you get a response, then you have done a good job. Congratulations!
Administrative Tasks
First, add the user icinga to the sudoers. Open a terminal as icinga user and run the following commands:
su -
adduser icinga sudo
Where,
- su - : switch to root user
- adduser : add icinga user to the /etc/sudoers file
Now logoff from Gnome and login again to test the sudo command for icinga user.
Second, from time to time, your debian installation requires some updates due to security issues. Run the following commands with root privileges to keep your installation up-to-date:
sudo apt update
sudo apt upgrade
From Debian repository
The following software packages are part of the official Debian Repository and can be installed with the following command:
sudo apt install mc htop cpulimit stress stress-ng stressant hdparm smartmontools inxi iotop dstat speedtest-cli iftop etherape monitorix cockpit bonnie++ fio gdu hwinfo sysstat cpuid
Where,
- mc - Midnight commander (tool ala Total Commander), a very handy tool.
- cpulimit - Tool to interrupt execution of a process.
- stress, stress-ng and stressant - Workload generators.
- hdparm - Test performance tool for ATA HDDs.
- smartmontools - Utility programs to control and monitor computer storage systems.
- inxi - Tool to find Linux sytem details (CPU, Kernel, Memory, etc.).
- dstat - Linux server performance tool, replacement for the vmstat, iostat, and ifstat.
- speedtest-cli - Internet bandwidth tester.
- iftop - Realtime network bandwidth monitoring tool.
- etherape - A packet sniffer/network traffic monitoring tool.
- monitorix - A lightweight system monitoring tool.
- cockpit - Administration of linux servers via a web browser.
- bonnie++ - Test hard drives and file systems for performance.
- fio - Flexible io-tester.
- gdu - Disk usage analyzer, primarly for SSD.
- **hwinfo - Probe for hardware.
- sysstat - All-in-One system performance tool.
- cpuid - Show CPU details.
From an external repository
The Phoronix Test Suite is a comprehensive testing and benchmarking platform available for the Windows and Linux operating system. The software is not part of the Debian Repository but can be installed very easily.
The installation is documented in the codelab BITI IPM Lab - Benchmark.
If you're running Linux inside a VirtualBox virtual machine, installing the Guest Additions software will help you get the most out of the system. VirtualBox Guest Additions will give the machine more capabilities, such as a shared clipboard with the host system, drag and drop file transfer, time synchronization, shared folders, automatic window resizing, and more.
In this guide, we'll be going over the step by step instructions to get VirtualBox Guest Additions installed on Debian based systems.
For Debian
The first thing you need to do is install a few prerequisite packages. Open a terminal and use your system's package manager to install them with the following commands.
Open a shell and run the following commands:
sudo apt update
sudo apt install build-essential dkms linux-headers-$(uname -r)
Note that the installed packages are needed to build the VBox kernel modules.
Next, on the virtual machine window, click on Devices > Insert Guest Additions CD Image.
Next, you need to create a mount point for the CD image:
sudo mkdir /media/cdrom0
sudo mount /dev/sr0 /media/cdrom0
Please note that the command mkdir /media/cdrom0 may return an error if the target directory already exists. in this case, you can ignore the error.
The command mount /dev/sr0 /media/cdrom0 will return the following message:
mount: /media/cdrom0: WARNING: source write-protected, mounted read-only.
This warning is correct because CD images are mounted read-only by default.
Next, change to the directory and list all files to check them out.
sudo cd /media/cdrom0
sudo ls
Here is a sample output:
AUTORUN.INF  runasroot.sh			VBoxSolarisAdditions.pkg
autorun.sh   TRANS.TBL				VBoxWindowsAdditions-amd64.exe
cert	     VBoxDarwinAdditions.pkg		VBoxWindowsAdditions.exe
NT3x	     VBoxDarwinAdditionsUninstall.tool	VBoxWindowsAdditions-x86.exe
OS2	     VBoxLinuxAdditions.run		windows11-bypass.reg
If no errors occur, run the following command to install the guest additions:
sudo sh ./VBoxLinuxAdditions.run
The sample output:
Verifying archive integrity... All good.
Uncompressing VirtualBox 6.1.38 Guest Additions for Linux........
VirtualBox Guest Additions installer
Removing installed version 6.1.38 of VirtualBox Guest Additions...
update-initramfs: Generating /boot/initrd.img-5.10.0-19-amd64
Copying additional installer modules ...
Installing additional modules ...
VirtualBox Guest Additions: Starting.
VirtualBox Guest Additions: Building the VirtualBox Guest Additions kernel
modules.  This may take a while.
VirtualBox Guest Additions: To build modules for other installed kernels, run
VirtualBox Guest Additions:   /sbin/rcvboxadd quicksetup <version>
VirtualBox Guest Additions: or
VirtualBox Guest Additions:   /sbin/rcvboxadd quicksetup all
VirtualBox Guest Additions: Building the modules for kernel 5.10.0-19-amd64.
update-initramfs: Generating /boot/initrd.img-5.10.0-19-amd64
VirtualBox Guest Additions: Running kernel modules will not be replaced until the system is restarted
Once the installation is complete, all you need to do now is reboot the system for the new changes to take effect.
sudo reboot
That's all there is to it. When the virtual machine finishes loading back up, you'll be able to utilize the shared clipboard, drag and drop function, automatic resolution resizing, and other features mentioned earlier. Make sure you enable the shared clipboard and drag and drop option if you wish to use them, from inside the Devices menu.
For Microsoft Windows
For Windows, follow the official guide.