In this lab, you will:
- Install OpenTofu
- Provision a SKS Cluster
Prerequisites
- OpenTofu CLI
- IDE (IntelliJ IDEA, Visual Studio Code) with Terraform Plugin installed
- SSH Client installed (OpenSSH, PuTTY)
In the future, it will be more comfortable if you're able to use terraform from your PC and IDE.
To install OpenTofu, refer to the respective documentation here:
Please ensure, that the OpenTofu binary is in your path!
- https://www.wikihow.com/Change-the-PATH-Environment-Variable-on-Windows
- In Linux or MacOS, append the path you've chosen to your path variable (if the package installer didn't take care about this).
Check if OpenTofu is installed properly
To check if terraform is installed and as accessible, open a shell and run: tofu version. This should return the version of OpenTofu. If not and you changed the PATH before, ensure that you restarted your terminal and the Terraform Binary is located in a directory which is accessible there.
Exoscale is a European Cloud Provider, which provides services as:
- Compute (Virtual Machines)
- Kubernetes (SKS)
- Database-as-a-Service (DBaaS)
- Object Storage (S3 Compatible)
During this lab, we will deal with virtual instances and object storage. In the first step, we will provision a virtual machine there.
You can log in to the Exoscale Console here.
There are many steps to get infrastructure working when doing this manually This would be fairly enough to try out some new things, but in the real world you might want to do this in a more reproducible and scalable way.
This is where Infrastructure-as-Code comes into play. When you are provisioning 100s of instances, you might not want to click through the consoles for every one you are provisioning. Infrastructure-as-Code (IaC) gives you the possibility to configure your instances:
- As code
- In a declarative way
- Scalable
- With development best practices in mind.
Let's take a closer look on all of this.
"Infrastructure-as-Code is an approach to infrastructure-automation based on practices from software development. It emphasizes consisten, repeatable routines for provisioning and changing systems and their configuration. You make changes to code, then use automation to tsest and apply those changes to your systems. (Kief Morris(2020), Infrastructure-as-Code, 2nd Edition)"
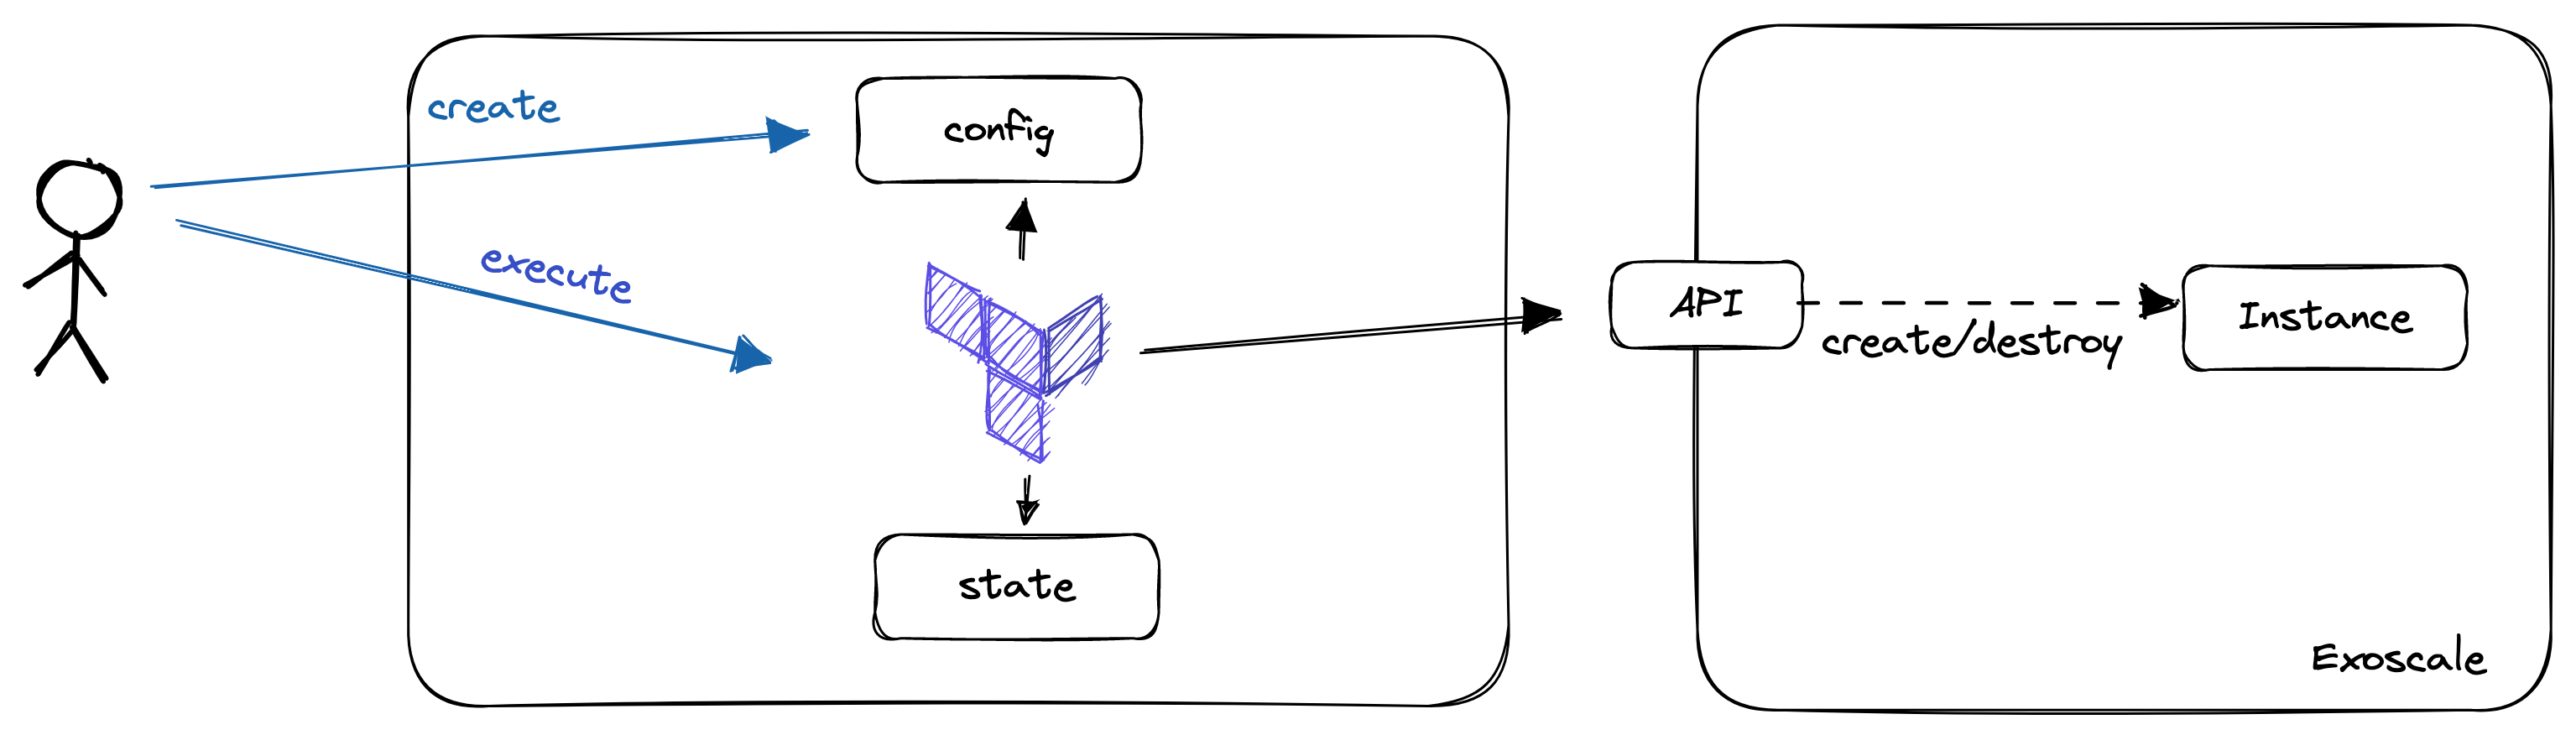
When we're talking about Infrastructure-as-Code, we are no more creating our Infrastructure via the UI (ClickOps). Instead, we are writing Code, mainly in a declarative way to describe the state, we want our Infrastructure to be in after it is applied.
Declarative configuration means that you express your intention (desired state), and a tool takes care of transitioning the managed objects to this state. Using imperative language, you would tell the tooling what it should do. You can distinguish between these two styles using the following statements:
- Imperative: Dear Tool, execute command A, B and C
- Declarative: Dear Tool, please transition my infrastructure to exactly this state
Please note, that each declarative tool, will have some kind of imperative logic in it to transition to the state.
When we're provisioning Infrastructure-as-Code, we often have the possibility to modularize components, as well as having mechanisms in there, which help us creating multiple, similar objects. This are practices, we know from typical software development. As we are using practices from Software Development, we should also treat our Infrastructure as such. Therefore, the code should be versioned, there should be automatic tests in place and pull requests should be on the order of the day.
There are many tools out there for Infrastructure-as-Code like:
- OpenTofu/Terraform
- Pulumi
- Crossplane
Which tool you use, often depends on your own preferences and your use-cases. In this lab, we will take a closer look on OpenTofu.
Further Information / Videos:
- DevOps with Nana: Infrastructure-as-Code https://www.youtube.com/watch?v=POPP2WTJ8es
Before we will start with our first configuration, we will put some light on OpenTofu.
OpenTofu is an Infrastructure-as-Code tool forked from Terraform which was initially developed by Hashicorp. It uses a declarative language to describe infrastructure. The language used is the "Hashicorp Configuration Language (HCL)". It is designed to work with many cloud providers. Nevertheless, it is not really cloud-agnostic as knowledge about the individual providers is needed when writing the code.
To start using OpenTofu, we should be familiar with the following terms:
- State: The current configuration of our managed resources. The state can be stored in the local filesystem (terraform.tfstate), or remote backends, as S3 Buckets or consul
- Provider: Implements the commands needed to communicate with the cloud provider. e.g. an Exoscale provider knows how to talk to the Exoscale API and how to get from one state to another.
- Resources: The Objects you are creating and managing with OpenTofu. As an example, a virtual machine is a resource.
- Data Sources: Describe objects we can query (!= write) in OpenTofu. In amazon, the AMIs (Amazon Machine Images / Templates) are implemented as datasources you can query
- Variables: Give us the possibility to parametrize terraform configurations.
For this lab, we will use a local state, Exoscale as provider and a Compute resource to create our Virtual Machine.
Goal:
- You will be able to provision a very simple Kubernetes Cluster using OpenTofu
Task:
Your Boss heard about a new technique to provision Kubernetes Clusters and that Cloud Providers provide managed kubernetes Services. He tells you that you should get familiar with this and provision a SKS Cluster using OpenTofu
Checklist:
- [ ] SKS Cluster is provisioned
- [ ] You are able to connect to the SKS Cluster using kubectl
- Create a directory, where you want to store your configuration
- Open an IDE of your choice and open this directory
Creating an API Key and Secret for Exoscale
- Open the Exoscale Console
- Click on "IAM" -> "API KEYS"
- Add Key
- Give the Key a meaningful name
- Restrict the Key to Compute
- Click "Create" and store the credentials at a secure place
Provider configuration
- Create a file called
versions.tfin your directory - Copy the following block in the file, replace key and secret with your API secrets
- Warning! When doing this on production environments (and in the next Labs), never store the secrets in this file, Instead, use mechanisms supported by the provider (e.g. Environment Variables)
terraform {
  required_providers {
    exoscale = {
      source  = "exoscale/exoscale"
      version = "0.54.1"
    }
  }
}

provider "exoscale" {
  key = "key"
  secret = "secret"
}
- This should be enough to run our first terraform command
tofu init
- This leads to the following output
Initializing the backend...

Initializing provider plugins...
- Installing exoscale/exoscale v0.54.1...

OpenTofu has been successfully initialized!

You may now begin working with OpenTofu. Try running "tofu plan" to see
any changes that are required for your infrastructure. All OpenTofu commands
should now work.

If you ever set or change modules or backend configuration for OpenTofu,
rerun this command to reinitialize your working directory. If you forget, other
commands will detect it and remind you to do so if necessary.
In the second step, we will create security groups that will be needed to provision our SKS Cluster ...
To do so, we'll create a second file called main.tf. Furthermore, we copy the following configuration in this file:
resource "exoscale_security_group" "my_security_group" {
  name = "my-sks-cluster-sg"
}

resource "exoscale_security_group_rule" "kubelet" {
  security_group_id = exoscale_security_group.my_security_group.id
  description       = "Kubelet"
  type              = "INGRESS"
  protocol          = "TCP"
  start_port        = 10250
  end_port          = 10250
  # (beetwen worker nodes only)
  user_security_group_id = exoscale_security_group.my_security_group.id
}

resource "exoscale_security_group_rule" "cilium_vxlan" {
  security_group_id = exoscale_security_group.my_security_group.id
  description       = "Cilium VXLAN"
  type              = "INGRESS"
  protocol          = "UDP"
  start_port        = 8472
  end_port          = 8472
  user_security_group_id = exoscale_security_group.my_security_group.id
}

resource "exoscale_security_group_rule" "cilium_health" {
  security_group_id = exoscale_security_group.my_security_group.id
  description       = "Cilium Health Check"
  type              = "INGRESS"
  protocol          = "ICMP"
  icmp_code         = 0
  icmp_type         = 8
  user_security_group_id = exoscale_security_group.my_security_group.id
}

resource "exoscale_security_group_rule" "cilium_health_tcp" {
  security_group_id = exoscale_security_group.my_security_group.id
  description       = "Cilium Health Check"
  type              = "INGRESS"
  protocol          = "TCP"
  start_port        = 4240
  end_port          = 4240
  user_security_group_id = exoscale_security_group.my_security_group.id
}
Data Sources are here to get configurations from your cloud provider, but will change nothing and are used for referencing in other objects
Resources are objects you are managing with terraform
- Now we could try to find out what this would lead to
- Change to your terraform directory in the shell and execute:
tofu plan
- You get some output about the things which would happen now, most probably you'll see that the security group and the rules will be created
- If you are happy with that, apply this configuration
tofu apply
- You see the same output as before and get prompted if you really want to do this, accept with "yes"
- After a short period of time, you'll see the following output
Plan: 5 to add, 0 to change, 0 to destroy.

Do you want to perform these actions?
  OpenTofu will perform the actions described above.
  Only 'yes' will be accepted to approve.

  Enter a value: yes

exoscale_security_group.my_security_group: Creating...
exoscale_security_group.my_security_group: Creation complete after 4s [id=336902ef-51f6-4982-a276-2ee474620f89]
exoscale_security_group_rule.cilium_vxlan: Creating...
exoscale_security_group_rule.kubelet: Creating...
exoscale_security_group_rule.cilium_health_tcp: Creating...
exoscale_security_group_rule.cilium_health: Creating...
exoscale_security_group_rule.cilium_vxlan: Creation complete after 4s [id=c33483ae-b116-4096-9d4b-139168784f14]
exoscale_security_group_rule.kubelet: Creation complete after 4s [id=67771f1d-fc2a-4caf-b9d1-9d6a6cd1b114]
exoscale_security_group_rule.cilium_health_tcp: Creation complete after 4s [id=85755d96-6380-480f-bc91-9e5eb1326aa7]
exoscale_security_group_rule.cilium_health: Creation complete after 4s [id=925b0167-411b-4fcf-a681-cf9feda1cf0f]

Apply complete! Resources: 5 added, 0 changed, 0 destroyed.
- After some time you might want to spin down your infrastructure (thing of demos for courses)
- You can simply tear it down by typing
tofu destroy
- The tool will ask you if you are sure that you want to remove your instance
- Type yes
- After some time you see the following output:
OpenTofu used the selected providers to generate the following execution plan. Resource actions are indicated with the following symbols:
  - destroy

OpenTofu will perform the following actions:

  # exoscale_security_group.my_security_group will be destroyed
  - resource "exoscale_security_group" "my_security_group" {
      - id   = "336902ef-51f6-4982-a276-2ee474620f89" -> null
      - name = "my-sks-cluster-sg" -> null
    }

  # exoscale_security_group_rule.cilium_health will be destroyed
  - resource "exoscale_security_group_rule" "cilium_health" {
      - description            = "Cilium Health Check" -> null
      - icmp_code              = 0 -> null
      - icmp_type              = 8 -> null
      - id                     = "925b0167-411b-4fcf-a681-cf9feda1cf0f" -> null
      - protocol               = "ICMP" -> null
      - security_group         = "my-sks-cluster-sg" -> null
      - security_group_id      = "336902ef-51f6-4982-a276-2ee474620f89" -> null
      - type                   = "INGRESS" -> null
      - user_security_group    = "my-sks-cluster-sg" -> null
      - user_security_group_id = "336902ef-51f6-4982-a276-2ee474620f89" -> null
    }

  # exoscale_security_group_rule.cilium_health_tcp will be destroyed
  - resource "exoscale_security_group_rule" "cilium_health_tcp" {
      - description            = "Cilium Health Check" -> null
      - end_port               = 4240 -> null
      - id                     = "85755d96-6380-480f-bc91-9e5eb1326aa7" -> null
      - protocol               = "TCP" -> null
      - security_group         = "my-sks-cluster-sg" -> null
      - security_group_id      = "336902ef-51f6-4982-a276-2ee474620f89" -> null
      - start_port             = 4240 -> null
      - type                   = "INGRESS" -> null
      - user_security_group    = "my-sks-cluster-sg" -> null
      - user_security_group_id = "336902ef-51f6-4982-a276-2ee474620f89" -> null
    }

  # exoscale_security_group_rule.cilium_vxlan will be destroyed
  - resource "exoscale_security_group_rule" "cilium_vxlan" {
      - description            = "Cilium VXLAN" -> null
      - end_port               = 8472 -> null
      - id                     = "c33483ae-b116-4096-9d4b-139168784f14" -> null
      - protocol               = "UDP" -> null
      - security_group         = "my-sks-cluster-sg" -> null
      - security_group_id      = "336902ef-51f6-4982-a276-2ee474620f89" -> null
      - start_port             = 8472 -> null
      - type                   = "INGRESS" -> null
      - user_security_group    = "my-sks-cluster-sg" -> null
      - user_security_group_id = "336902ef-51f6-4982-a276-2ee474620f89" -> null
    }

  # exoscale_security_group_rule.kubelet will be destroyed
  - resource "exoscale_security_group_rule" "kubelet" {
      - description            = "Kubelet" -> null
      - end_port               = 10250 -> null
      - id                     = "67771f1d-fc2a-4caf-b9d1-9d6a6cd1b114" -> null
      - protocol               = "TCP" -> null
      - security_group         = "my-sks-cluster-sg" -> null
      - security_group_id      = "336902ef-51f6-4982-a276-2ee474620f89" -> null
      - start_port             = 10250 -> null
      - type                   = "INGRESS" -> null
      - user_security_group    = "my-sks-cluster-sg" -> null
      - user_security_group_id = "336902ef-51f6-4982-a276-2ee474620f89" -> null
    }

Plan: 0 to add, 0 to change, 5 to destroy.
- If you take a look on the AWS Console, the Instance should be terminated
Now we want to create an SKS Cluster with OpenTofu. To do so, we will create a new file called sks.tf and copy the following configuration in it:
locals {
  zone = "at-vie-2"
}

resource "exoscale_sks_cluster" "my_sks_cluster" {
   zone = local.zone
   name = "my-sks-cluster"
   cni = "cilium"
}
The locals block defines a local variable named zone with a value of "at-vie-2". Local variables are convenient to avoid hardcoding values multiple times in the configuration.
The resource block defines a resource of type exoscale_sks_cluster named my_sks_cluster. This resource represents an SKS (Simple Kubernetes Service) cluster on Exoscale, a cloud provider.
The zone attribute of the exoscale_sks_cluster resource is set to the local variable zone, which means the SKS cluster will be created in the "at-vie-2" zone.
The name attribute is set to "my-sks-cluster", which will be the name of the SKS cluster.
The cni attribute is set to "cilium", which specifies that the Cilium CNI (Container Network Interface) plugin will be used for networking in the Kubernetes cluster.
After saving the configuration, run tofu init to initialize the directory and download the Exoscale provider.
Then run tofu plan to see what changes will be applied to the infrastructure. You should see the following output:
OpenTofu used the selected providers to generate the following execution plan. Resource actions are indicated with the following symbols:
  + create

OpenTofu will perform the following actions:

  # exoscale_security_group.my_security_group will be created
  + resource "exoscale_security_group" "my_security_group" {
      + id   = (known after apply)
      + name = "my-sks-cluster-sg"
    }

  # exoscale_security_group_rule.cilium_health will be created
  + resource "exoscale_security_group_rule" "cilium_health" {
      + description            = "Cilium Health Check"
      + icmp_code              = 0
      + icmp_type              = 8
      + id                     = (known after apply)
      + protocol               = "ICMP"
      + public_security_group  = (known after apply)
      + security_group         = (known after apply)
      + security_group_id      = (known after apply)
      + type                   = "INGRESS"
      + user_security_group    = (known after apply)
      + user_security_group_id = (known after apply)
    }

  # exoscale_security_group_rule.cilium_health_tcp will be created
  + resource "exoscale_security_group_rule" "cilium_health_tcp" {
      + description            = "Cilium Health Check"
      + end_port               = 4240
      + id                     = (known after apply)
      + protocol               = "TCP"
      + public_security_group  = (known after apply)
      + security_group         = (known after apply)
      + security_group_id      = (known after apply)
      + start_port             = 4240
      + type                   = "INGRESS"
      + user_security_group    = (known after apply)
      + user_security_group_id = (known after apply)
    }

  # exoscale_security_group_rule.cilium_vxlan will be created
  + resource "exoscale_security_group_rule" "cilium_vxlan" {
      + description            = "Cilium VXLAN"
      + end_port               = 8472
      + id                     = (known after apply)
      + protocol               = "UDP"
      + public_security_group  = (known after apply)
      + security_group         = (known after apply)
      + security_group_id      = (known after apply)
      + start_port             = 8472
      + type                   = "INGRESS"
      + user_security_group    = (known after apply)
      + user_security_group_id = (known after apply)
    }

  # exoscale_security_group_rule.kubelet will be created
  + resource "exoscale_security_group_rule" "kubelet" {
      + description            = "Kubelet"
      + end_port               = 10250
      + id                     = (known after apply)
      + protocol               = "TCP"
      + public_security_group  = (known after apply)
      + security_group         = (known after apply)
      + security_group_id      = (known after apply)
      + start_port             = 10250
      + type                   = "INGRESS"
      + user_security_group    = (known after apply)
      + user_security_group_id = (known after apply)
    }

  # exoscale_sks_cluster.my_sks_cluster will be created
  + resource "exoscale_sks_cluster" "my_sks_cluster" {
      + addons           = (known after apply)
      + aggregation_ca   = (known after apply)
      + cni              = "cilium"
      + control_plane_ca = (known after apply)
      + created_at       = (known after apply)
      + endpoint         = (known after apply)
      + exoscale_ccm     = true
      + id               = (known after apply)
      + kubelet_ca       = (known after apply)
      + metrics_server   = true
      + name             = "my-sks-cluster"
      + nodepools        = (known after apply)
      + service_level    = "pro"
      + state            = (known after apply)
      + version          = (known after apply)
      + zone             = "at-vie-2"
    }

Plan: 6 to add, 0 to change, 0 to destroy.
If you are happy with the changes, run tofu apply to apply them. You should see the following output:
Plan: 6 to add, 0 to change, 0 to destroy.

Do you want to perform these actions?
  OpenTofu will perform the actions described above.
  Only 'yes' will be accepted to approve.

  Enter a value: yes

exoscale_security_group.my_security_group: Creating...
exoscale_sks_cluster.my_sks_cluster: Creating...
exoscale_security_group.my_security_group: Creation complete after 3s [id=40097281-ed1c-46f0-b234-72a743317036]
exoscale_security_group_rule.cilium_health: Creating...
exoscale_security_group_rule.cilium_vxlan: Creating...
exoscale_security_group_rule.kubelet: Creating...
exoscale_security_group_rule.cilium_health_tcp: Creating...
exoscale_security_group_rule.cilium_vxlan: Creation complete after 4s [id=8595985e-bcb4-410e-85dc-898248f42b69]
exoscale_security_group_rule.kubelet: Creation complete after 4s [id=8be196cc-ea4a-4e99-b868-c1e47663afc9]
exoscale_security_group_rule.cilium_health_tcp: Creation complete after 4s [id=0d4c2888-4b81-4ad7-8dfc-f41cd74f7575]
exoscale_sks_cluster.my_sks_cluster: Still creating... [10s elapsed]
exoscale_security_group_rule.cilium_health: Creation complete after 7s [id=8138882b-30db-44ed-8dbd-b94e7736a559]
exoscale_sks_cluster.my_sks_cluster: Still creating... [20s elapsed]
exoscale_sks_cluster.my_sks_cluster: Still creating... [30s elapsed]
exoscale_sks_cluster.my_sks_cluster: Still creating... [40s elapsed]
exoscale_sks_cluster.my_sks_cluster: Still creating... [50s elapsed]
exoscale_sks_cluster.my_sks_cluster: Still creating... [1m0s elapsed]
exoscale_sks_cluster.my_sks_cluster: Still creating... [1m10s elapsed]
exoscale_sks_cluster.my_sks_cluster: Still creating... [1m20s elapsed]
exoscale_sks_cluster.my_sks_cluster: Still creating... [1m30s elapsed]
exoscale_sks_cluster.my_sks_cluster: Creation complete after 1m40s [id=79972308-1962-4639-b926-6f931976cedc]

Apply complete! Resources: 6 added, 0 changed, 0 destroyed.
Right, you need the Kubernetes Configuration to access your cluster. It would be possible to get it from the Exoscale Console, but we want to do it with OpenTofu.
To do so, we will create a new file called kubeconfig.tf and copy the following configuration in it:
# (administration credentials)
resource "exoscale_sks_kubeconfig" "my_sks_kubeconfig" {
  zone       = local.zone
  cluster_id = exoscale_sks_cluster.my_sks_cluster.id
  user   = "kubernetes-admin"
  groups = ["system:masters"]
  ttl_seconds           = 3600
  early_renewal_seconds = 300
}
resource "local_sensitive_file" "my_sks_kubeconfig_file" {
  filename        = "kubeconfig"
  content         = exoscale_sks_kubeconfig.my_sks_kubeconfig.kubeconfig
  file_permission = "0600"
}
After saving the configuration, run tofu apply to apply them. You should see the following output:
exoscale_security_group.my_security_group: Refreshing state... [id=40097281-ed1c-46f0-b234-72a743317036]
exoscale_sks_cluster.my_sks_cluster: Refreshing state... [id=79972308-1962-4639-b926-6f931976cedc]
exoscale_security_group_rule.cilium_health: Refreshing state... [id=8138882b-30db-44ed-8dbd-b94e7736a559]
exoscale_security_group_rule.cilium_vxlan: Refreshing state... [id=8595985e-bcb4-410e-85dc-898248f42b69]
exoscale_security_group_rule.cilium_health_tcp: Refreshing state... [id=0d4c2888-4b81-4ad7-8dfc-f41cd74f7575]
exoscale_security_group_rule.kubelet: Refreshing state... [id=8be196cc-ea4a-4e99-b868-c1e47663afc9]

OpenTofu used the selected providers to generate the following execution plan. Resource actions are indicated with the following symbols:
  + create

OpenTofu will perform the following actions:

  # exoscale_sks_kubeconfig.my_sks_kubeconfig will be created
  + resource "exoscale_sks_kubeconfig" "my_sks_kubeconfig" {
      + cluster_id            = "79972308-1962-4639-b926-6f931976cedc"
      + early_renewal_seconds = 300
      + groups                = [
          + "system:masters",
        ]
      + id                    = (known after apply)
      + kubeconfig            = (sensitive value)
      + ready_for_renewal     = true
      + ttl_seconds           = 3600
      + user                  = "kubernetes-admin"
      + zone                  = "at-vie-2"
    }

  # local_sensitive_file.my_sks_kubeconfig_file will be created
  + resource "local_sensitive_file" "my_sks_kubeconfig_file" {
      + content              = (sensitive value)
      + content_base64sha256 = (known after apply)
      + content_base64sha512 = (known after apply)
      + content_md5          = (known after apply)
      + content_sha1         = (known after apply)
      + content_sha256       = (known after apply)
      + content_sha512       = (known after apply)
      + directory_permission = "0700"
      + file_permission      = "0600"
      + filename             = "kubeconfig"
      + id                   = (known after apply)
    }

Plan: 2 to add, 0 to change, 0 to destroy.

Do you want to perform these actions?
  OpenTofu will perform the actions described above.
  Only 'yes' will be accepted to approve.

  Enter a value: yes

exoscale_sks_kubeconfig.my_sks_kubeconfig: Creating...
exoscale_sks_kubeconfig.my_sks_kubeconfig: Creation complete after 2s [id=13042316252923993323610489193665580134618587333:64523864957247071817109318741407431096266427702]
local_sensitive_file.my_sks_kubeconfig_file: Creating...
local_sensitive_file.my_sks_kubeconfig_file: Creation complete after 0s [id=aa4e3480279d7ed36c9be1dc8f518a1ed0900916]
Now you can find the Kubernetes configuration in the file kubeconfig in your current directory. You can use this file to access your Kubernetes cluster with kubectl.
Now you can use the Kubernetes configuration to inspect your cluster. To do so, run the following command:
kubectl --kubeconfig kubeconfig get all -n kube-system
To add nodes to the cluster, we will add the following configuration to the sks.tf file:
resource "exoscale_sks_nodepool" "my_sks_nodepool" {
  zone       = local.zone
  cluster_id = exoscale_sks_cluster.my_sks_cluster.id
  name       = "my-sks-nodepool"
  instance_type = "standard.medium"
  size          = 3
  security_group_ids = [
    exoscale_security_group.my_security_group.id,
  ]
}
In this codeblock, we define a resource of type exoscale_sks_nodepool named my_sks_nodepool. This resource represents a node pool in the SKS cluster. Furthermore, you might notice that we reference the security group we created earlier.
After saving the configuration, run tofu apply to apply them. You should see the following output:
OpenTofu will perform the following actions:

  # exoscale_sks_nodepool.my_sks_nodepool will be created
  + resource "exoscale_sks_nodepool" "my_sks_nodepool" {
      + cluster_id         = "79972308-1962-4639-b926-6f931976cedc"
      + created_at         = (known after apply)
      + disk_size          = 50
      + id                 = (known after apply)
      + instance_pool_id   = (known after apply)
      + instance_prefix    = "pool"
      + instance_type      = "standard.medium"
      + name               = "my-sks-nodepool"
      + security_group_ids = [
          + "40097281-ed1c-46f0-b234-72a743317036",
        ]
      + size               = 3
      + state              = (known after apply)
      + storage_lvm        = false
      + template_id        = (known after apply)
      + version            = (known after apply)
      + zone               = "at-vie-2"
    }

Plan: 1 to add, 0 to change, 0 to destroy.

Do you want to perform these actions?
  OpenTofu will perform the actions described above.
  Only 'yes' will be accepted to approve.

  Enter a value: yes

exoscale_sks_nodepool.my_sks_nodepool: Creating...
exoscale_sks_nodepool.my_sks_nodepool: Still creating... [10s elapsed]
exoscale_sks_nodepool.my_sks_nodepool: Still creating... [20s elapsed]
exoscale_sks_nodepool.my_sks_nodepool: Creation complete after 25s [id=07645dbb-260a-4a12-9e69-d6c1692a2f74]

Apply complete! Resources: 1 added, 0 changed, 0 destroyed.
After you have applied the changes, you can run the following command to see the nodes in your cluster:
kubectl --kubeconfig kubeconfig get nodes
To make it easier to access the Kubernetes cluster, we will add the following output to the outputs.tf file:
# Outputs
output "my_sks_cluster_endpoint" {
  value = exoscale_sks_cluster.my_sks_cluster.endpoint
}
#
output "my_sks_kubeconfig" {
  value = local_sensitive_file.my_sks_kubeconfig_file.filename
}

output "my_sks_connection" {
  value = format(
    "export KUBECONFIG=%s; kubectl cluster-info; kubectl get pods -A",
    local_sensitive_file.my_sks_kubeconfig_file.filename,
  )
}
After saving the configuration, run tofu apply to apply them. You should see the following output:
Do you want to perform these actions?
  OpenTofu will perform the actions described above.
  Only 'yes' will be accepted to approve.

  Enter a value: yes


Apply complete! Resources: 0 added, 0 changed, 0 destroyed.

Outputs:

my_sks_cluster_endpoint = "https://79972308-1962-4639-b926-6f931976cedc.sks-at-vie-2.exo.io"
my_sks_connection = "export KUBECONFIG=kubeconfig; kubectl cluster-info; kubectl get pods -A"
my_sks_kubeconfig = "kubeconfig"
Then you can run the following command to see the output:
tofu output <output_name>
To destroy the cluster, run the following command:
tofu destroy