Today, it's your job to deploy a simple application to Kubernetes and secure it as good as possible.
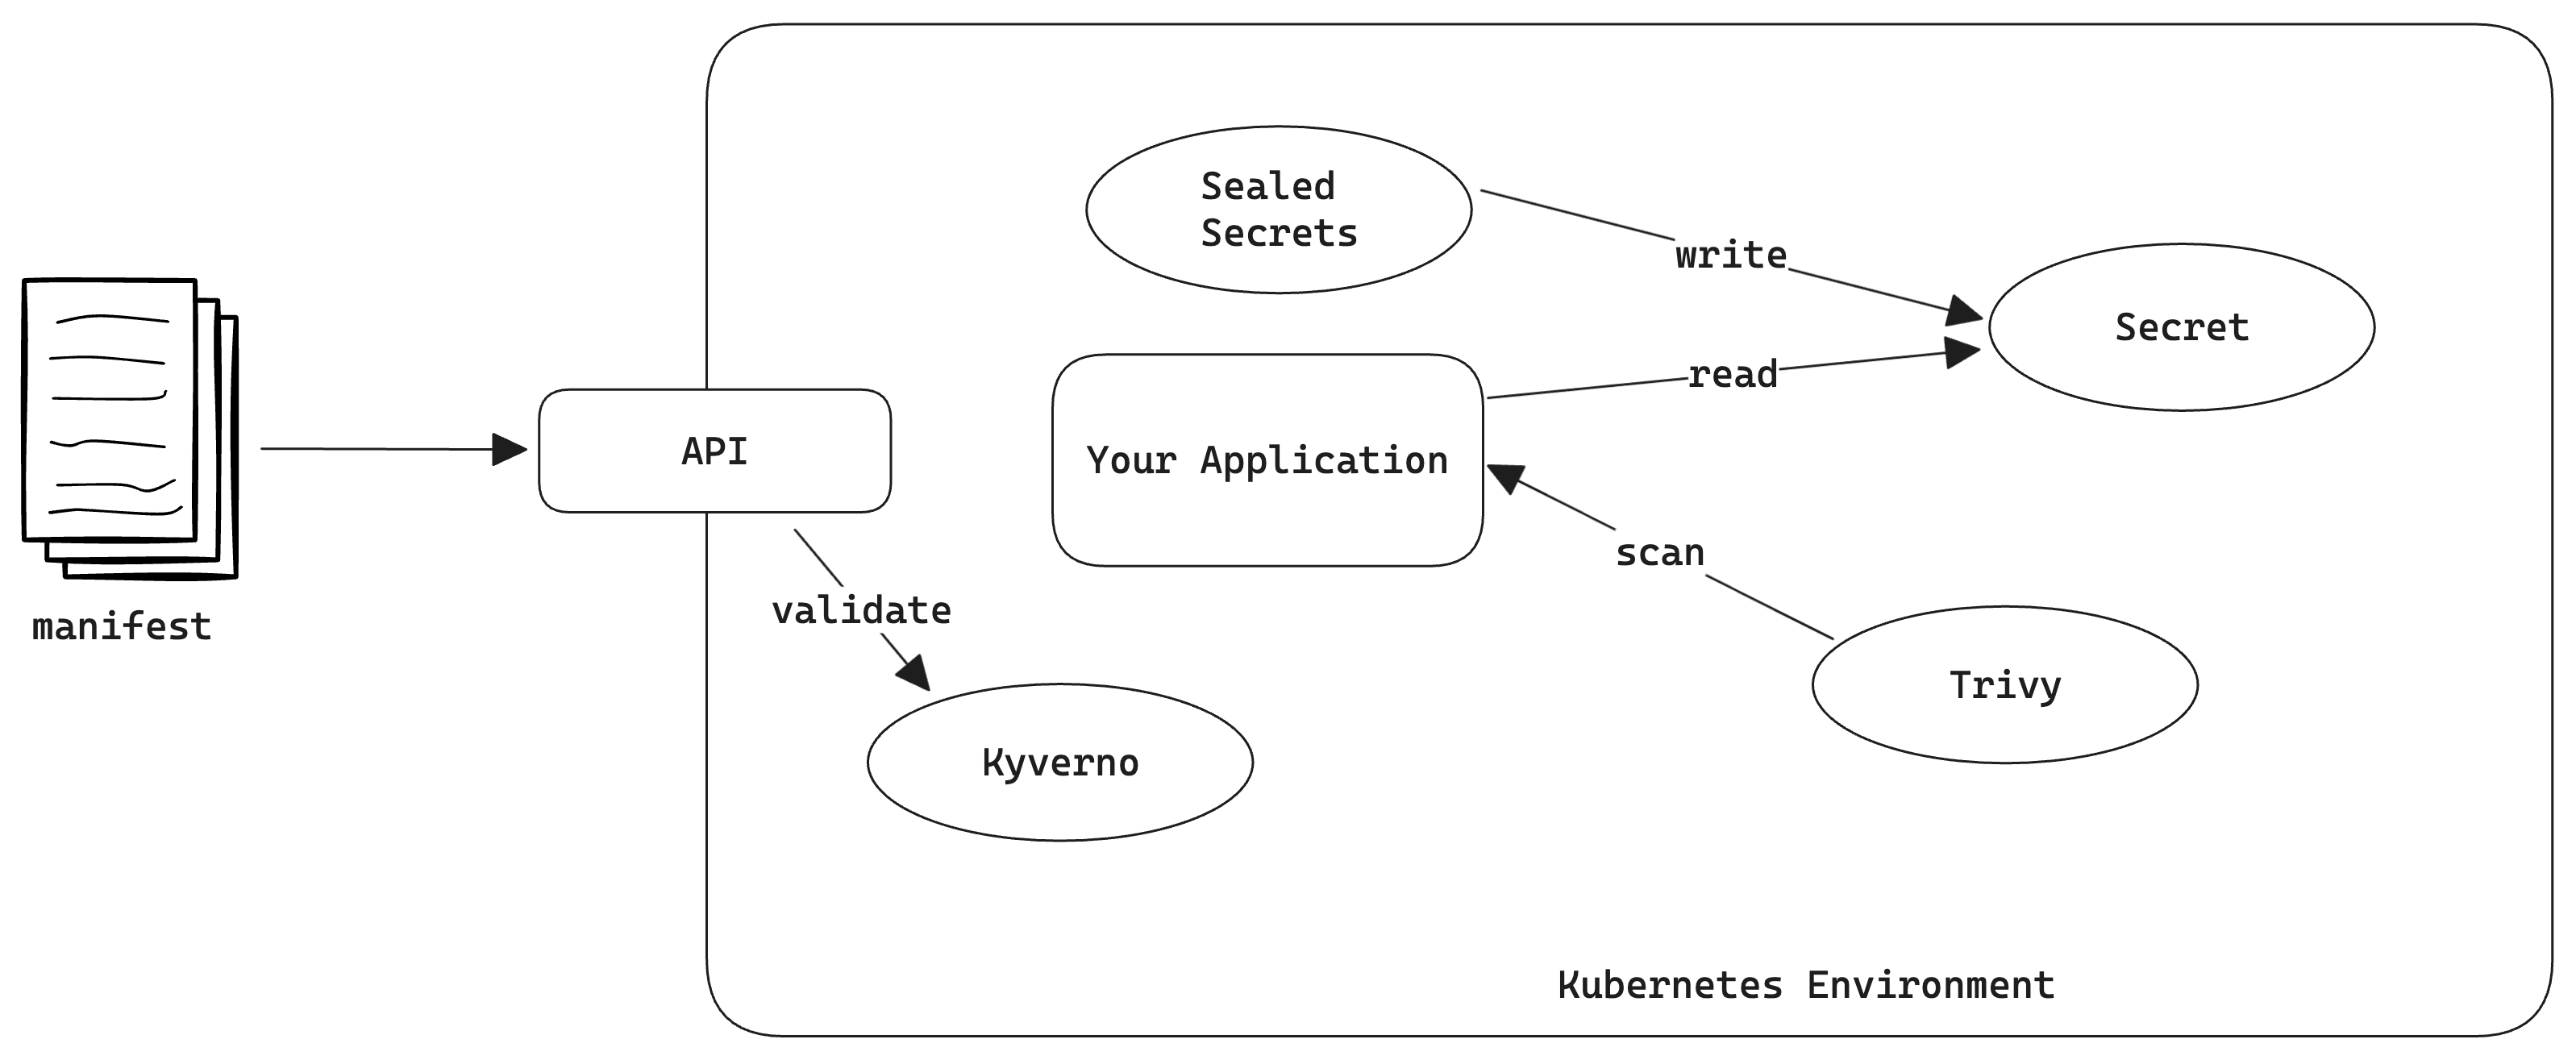 In this lab, you will:
- Deploy a simple application to Kubernetes
- Expose the application via a service
- Add recommended labels to the deployment
- Make the containers read-only
- Add Kubernetes Secrets to the application
- Configure Sealed Secrets
- Install Kyverno and add a policy to avoid containers without tags
- Install the Trivy Operator and scan your cluster for misconfigurations
Prerequisites
- Kubernetes Cluster (Rancher Desktop, Exoscale, AWS, ...)
- kubectl
In this task, you will create a simple manifest for the application. Create and apply a manifest for the application with the following content:
- Resources: Service, Deployment
- image: ghcr.io/thschue/podtato-head-uas
- name: docker.io/thschue/podtato-head-fh
- port: 8080
- replicas: 3
This manifest will create a service and a deployment for the application. The deployment will create 3 replicas of the application.
deployment.yaml
apiVersion: apps/v1
kind: Deployment
metadata:
  name: podtato-head
  labels:
    app: podtato-head
spec:
  replicas: 3
  selector:
    matchLabels:
      app: podtato-head
  template:
    metadata:
      labels:
        app: podtato-head
    spec:
      containers:
        - name: podtato-head
          image: ghcr.io/thschue/podtato-head-uas
          ports:
            - containerPort: 8080
service.yaml
apiVersion: v1
kind: Service
metadata:
  name: podtato-head
spec:
    selector:
        app: podtato-head
    ports:
    - protocol: TCP
      port: 8080
      targetPort: 8080
When you apply the manifest, you should be able to port-forward to the application and see the application. The port-forwarding command is:
kubectl port-forward service/podtato-head 8080:8080
Add Kubernetes Recommended Labels to the manifests. These labels might be used by third party software and should help them to get object data in a common manner (https://kubernetes.io/docs/concepts/overview/working-with-objects/common-labels/).
In your deployment.yaml, add:
metadata:
  labels:
    app.kubernetes.io/name: podtato-head
    app.kubernetes.io/version: latest
    app.kubernetes.io/component: application
When applying these labels, nothing noticeable will happen, but this might help other tools getting more information about your application.
Add a secret to the application and provide it as environment variable. The secret should contain the following information:
- Key: PODTATO_SECRET_MESSAGE, Value: "Hello Kubernetes Gurus!"
- Apply this to the cluster and verify that the application is working
This command will create a secret with the name podtato-secret and the key PODTATO_SECRET_MESSAGE with the value Hello Kubernetes Gurus!:
kubectl create secret generic podtato-secret --from-literal=PODTATO_SECRET_MESSAGE="Hello Kubernetes Gurus!"
To provide the secret to the application, you have to add the following environment variable to the deployment manifest:
spec:
  containers:
    - name: {container-name}
      image: ghcr.io/thschue/podtato-head-uas
      env:
      - name: PODTATO_SECRET_MESSAGE
        valueFrom:
          secretKeyRef:
            name: podtato-secret
            key: PODTATO_SECRET_MESSAGE
After you applied the manifest and reopened the application, you should see the secret message (somewhere on mouseover).
When you are working with Kubernetes Secrets and use them in manifests, you can provide them as plain text or base64 encoded. When using version control systems, this might be a security risk, as the secrets are stored in plain text in the repository. Therefore, you can use mechanisms like Sealed Secrets or various key management systems to encrypt the secrets. In this task, you will create a Sealed Secret and use it in the application.
Install Sealed Secrets
Sealed Secrets is implemented as a Kubernetes Controller. Therefore, you have to install it to your cluster. This can be done with the following command:
kubectl apply -f https://github.com/bitnami-labs/sealed-secrets/releases/download/v0.24.3/controller.yaml
You can verify that the controller is running with the following command:
kubectl get pods -n kube-system | grep sealed-secrets- You should see a pod called
sealed-secrets-controller-...and the status should beRunning
Delete the old secret
As we will create a new secret, we have to delete the old one. This can be done with the following command:
kubectl delete secret podtato-secret
Install the Sealed Secrets CLI
To create a Sealed Secret, you have to install the Sealed Secrets CLI. This can be done with the following command:
brew install kubesealor from the GitHub Releases
Create a Sealed Secret
Now it's time to create a Sealed Secret. This can be done with the following command: kubectl create secret generic podtato-secret --from-literal=PODTATO_SECRET_MESSAGE="Hello Kubernetes Gurus!" | kubeseal --format yaml > podtato-secret.yaml
After applying the manifest, you should see a Sealed Secret in your cluster:
kubectl get sealedsecret podtato-secret- and a secret:
kubectl get secret podtato-secret
Using Kyverno, you can enforce policies on your cluster. In this task, you will create a policy, which will enforce that containers must not be tagged with latest.
Your Task:
- Install Kyverno to your cluster
- Create a policy, which will enforce that containers must not be tagged with
latest - Apply the policy to your cluster
- Try to deploy a container with the tag
latestand verify that it is not working - Deploy the application with the image:
ghcr.io/podtato-head/podtato-server:0.3.2and verify that it is working
The next steps will guide you through the process of installing Kyverno and creating a policy, which will enforce that containers must not be tagged with latest.
Install Kyverno to your cluster
To install Kyverno to your cluster, you have to apply the following manifest:
kubectl create -f https://github.com/kyverno/kyverno/releases/download/v1.10.0/install.yaml- You can verify that Kyverno is running with the following command:
kubectl get pods -n kyverno
Create a policy, which will enforce that containers must not be tagged with latest
- Navigate to https://kyverno.io/policies/best-practices/disallow-latest-tag/disallow-latest-tag/ and copy the policy
- Copy the policy to a file called
disallow-latest-tag.yaml - Set the validationFailureAction to
enforcein your manifest - Apply the policy to your cluster:
kubectl apply -f disallow-latest-tag.yaml - Try to apply the initial manifest and verify that it is not working:
kubectl apply -f podtato-head.yaml - Change the image tag to
latestand verify that it is not working:kubectl apply -f podtato-head.yaml - Change the image to
ghcr.io/podtato-head/podtato-server:0.3.2and verify that it is working:kubectl apply -f podtato-head.yaml
Using Trivy, you can scan your container images for vulnerabilities. In this task, you will scan the container image of the application and verify that it is vulnerable.
Your Task:
- Install Trivy to your cluster
- Deploy a container that might be vulnerable to your cluster (e.g.
nginx:1.19.0) - Verify that the container is vulnerable
The next steps will guide you through the process of installing Trivy and scanning a container image for vulnerabilities.
Install Trivy to your cluster
To install Trivy to your cluster, you have to apply the following manifest:
kubectl apply -f https://raw.githubusercontent.com/aquasecurity/trivy-operator/v0.16.4/deploy/static/trivy-operator.yaml- Validate that Trivy is running:
kubectl get pods -n trivy-system
Deploy a container that might be vulnerable to your cluster
- Deploy a container that might be vulnerable to your cluster (e.g.
nginx:1.19.0):kubectl apply -f nginx.yaml - Validate that the container is running:
kubectl get pods - Take a look at the vulnerabilities:
kubectl get vulnerabilityreports.trivy.aquasecurity.github.io -A - Describe the vulnerability:
kubectl describe vulnerabilityreports.trivy.aquasecurity.github.io [name] -n [namespace]
Congrats! You have successfully deployed an application to Kubernetes and used various tools to improve the security of your cluster. You can now access the application via localhost:8080 and see the secret message.